August 29, 2009

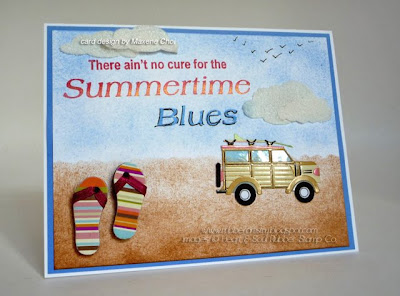
Ain't No Cure for the Summertime Blues

Hello everyone, I'm baaack!! No, I didn't go away, just have been super busy with work and life. I can't believe it's almost September, but it's still soooooo HOT! At least here in California in Silicon Valley. Yesterday temperatures reached 101 degrees, and today it's supposed to reach a high of 103. Eeeeksss!

In honor of this long and hot summer, I have three cards to share. I have to say, I've been having a lot of fun making these summer cards. I used sponges and regular dye ink pads to gently sponge the color on for all three elements: the sand, water and sky. You want to sponge the ink on these types of *scene* cards so it gives a soft muted look. The water on the vertical card was made by adding touches of white gel pen to make the look of waves, bubbles and foam. I really enjoy doing these beach scenes! Oh, I also tore scratch paper and used the edge to mask off where the sand meets the skyline. This fun stamp saying is from Heart & Soul Rubber Stamp Company, and it's called *Summertime Blues* (item # 1649).


Thanks for stopping by!!!

stamps: Heart & Soul Rubber Stamp Co
paper: Stampin Up cardstock
ink: Dew Drop Brilliance Rocket Red Gold, Colorbox Chalk Warm Red, Stampin' Up
Accessories: stickers - Jolee's/Sandylion/JoAnn's, art sponges, white gel pen, cloud template

Here is a historical clip of Eddie Cochran singing his popular hit song! Enjoy!

Read more...

July 20, 2009

FRAGMENTS Travel Scrapbook

Here is my long-awaited Fragments Travel Scrapbook that I finally recently finished! I'm really happy with the way it turned out. This is one of those projects that could have turned out looking really bad if I wasn't careful, lol!


I began with an older kraft chipboard scrapbook by Making Memories. (I don't think you can get it anymore - I kind of stash and hoard things for a while). It's made with blank chipboard covers and a beautiful canvas spine that's been embossed with travel words and logos. Other than being undecorated, it's a regular 2-ring square scrapbook that takes 8" x 8" pages.


You can see the rings here:


I took my favorite designer scrapbook papers that I've also been saving for a while and measured and cut to the same size as the scrapbook cover. I cut out 4 sheets - 2 for the front and back and 2 for the inside covers. I also cut out a couple of other smaller pieces of fun travel papers from Making Memories to collage onto the front of the album. Using my foam brushes and archival glue by Lineco, I thoroughly coated the backs of all the papers and adhered them to the album. I like using Lineco glues for my scrapbooks because they're conservation grade, which means it'll help conserve the album for many years by not using harmful ingredients.


I waited a couple days to make sure the glue had completely dried and settled into the album to add the fragments and stamping. I didn't want to add them while things were still damp because there was a chance it might warp and bubble the papers. I decided to use all rub-ons and stickers for the fragments this time, since I had already tried alcohol inks last time (on my mini album 2 posts below).

After applying various travel-themed stickers by Making Memories on top of the fragments, I flipped them over and applied Ranger's Glossy Accents glue on the back. Since fragments are by nature glossy, you want to use a glossy glue to adhere them (a glue that dries shiny and clear), and not a matte glue. Ranger's glues are made to work with the fragments and the glue is acid-free. I started out slowly to see how much glue was going to come out.


I wanted to put a lot of glue on since these fragments were going on the cover of the album, I know that they're going to get a lot of knocking and bumping.


Here's how much glue I ended up putting on each fragment. For a smaller project like a card or something that's going to be protected you could use a lot less glue. IMPORTANT TIP: Before I glued these fragment pieces down to the album, I had already placed all of them where I wanted them to be, then snapped a photo of it and printed it out. That's how I was able to confidently and quickly glue the pieces and stick them on without much fuss!


On some of the fragments I used travel rub-ons by Basic Grey - they were extremely easy to rub-on because the fragments are hard, they went on very easily! I glued them down on the side where the rub-on was to protect them from being scratched off. They show through the fragments beautifully, as you can see on the album cover.

The final touches were stamping and heat embossing the word *travel*, which I embossed with Tim Holtz's Distress Powder in *Tattered Rose*. The reason it looks pinkish-brown is because I used dark brown craft ink! It's amazing, the combos you can come up with!

Thanks for stopping by, I hope you enjoyed my new scrapbook album! Stay tuned for more fun stuff!

Read more...

More FRAGMENTS - Tag

Hellooo! I want to thank my crafting friends Marian Garcia and Tracy Bollinger for this next share.

Tracy is a total Tim Holtz-technique expert. She can basically make anything that Tim can make -- she could even teach Tim Holtz a thing to two! A few months ago she showed us a bunch of tags she made by following the steps in Tim's *12 Tags of Christmas* (2007 and 2008). and his *technique challenges* on his blog. Marian got to keep the one Tracy made with FRAGMENTS and I immediately snatched it from her (to borrow, of course)! Keep reading below the video!

I'm trying this for the first time. I hope this video gets embedded correctly. It's Tim Holtz himself showing the different ways to use FRAGMENTS:


Tracy's tag combines alcohol inking on FRAGMENTS, and the ink removal technique which was featured as the *August Technique Challenge* on Tim Holtz's blog.


HERE ARE THE DIRECTIONS TO MAKE THE TAG:
THE STEPS TO MAKE THE TAG WERE COPIED AND PASTED DIRECTLY FROM TIM HOLTZ'S BLOG:
AUGUST TECHNIQUE CHALLENGE
**********************

"august technique challenge" - tim holtz(c) 2008

supplies: craft sheet, adirondack alcohol inks, blending solution, ink applicator tool, jet black archival ink pad, glossy accents, glossy paper (ranger); fragments (tim holtz idea-ology); ghost (heidi swapp); non-stick scissors (tonic); stamps (stampers anonymous); soft cloth

step 1: apply a piece of felt to the ink applicator tool.

step 2: ink up the tool by placing the nib of the alcohol ink bottle into the felt and squeeze for about 2 seconds.

step 3: repeat with any additional colors you want (*tip: be sure not to overlap colors to avoid making mud).

step 4: ink up one side of the fragment by tapping the inked tool on the fragment completely covering it with ink (*tip:be sure to just ink ONE LAYER AND STOP!)

step 5: wait about 5 seconds and then you can apply additional layers of color (*tip: you can add as many layers of ink as you wish just wait 5 second between layers).

step 6: allow inked surface to dry completely.

step 7: ink up a stamp with jet black archival (*tip: stamp selection is key here - you want an image with a definite shape, not words, and not faces - you'll see why...).

step 8: place stamp inked rubber side up and press fragment inked side down over image.

step 9: immediately lift off of stamp and LIGHTLY blot wet ink off of fragment with a soft cloth (*tip: you need to work quickly as archival ink is a permanent ink and will dry black on the fragment if you wait too long).

step 10: working from a clean area of the towel, wipe off remaining archival ink to reveal image. wait a minute! what just happened? did my image disappear? it sure did...

step 11: place the fragment over a piece of white glossy cardstock INKED side down - WOW! the jet black archival ink actually removes the alcohol ink underneath when you remove it while it's still wet - a weird chemical reaction, it works every time. (*tip: now do you see why we don't want to use words? they would appear backwards at this point {well there is a way to stamp in reverse, but that's a whole other technique} i have to say i don't mind backwards numbers for some reason though?..).

step 12: apply a small amount of glossy accents around the inked side edge of the fragment and place down on to glossy cardstock.

step 13: trim excess cardstock to size of fragment with non-stick scissors (*tip: glossy accents bonds to paper in about 7-10 seconds!).

step 14: repeat above steps to create enough mosaics for tag of project (*tip: be sure to change felt between colors).

step 15: (variation) - you can also do this technique on anything smooth - heidi swapp ghosts, memory glass, dominoes, transparencies, metal, mica, and more...

*******************************
~ all these products can be found at Creative Play Stamps!

craft sheet, adirondack alcohol inks, blending solution, ink applicator tool, jet black archival ink pad, glossy accents, glossy paper (ranger); fragments (tim holtz idea-ology); ghost (heidi swapp); non-stick scissors (tonic); stamps (stampers anonymous); soft cloth

Read more...

June 29, 2009

Tim Holtz *Fragments* and Mini Book

I'm excited to share about Tim Holtz's *Fragments* and this little mini book I made over the weekend - it was my first time working with Tim Holtz's new (semi-new) FRAGMENTS, and it was so fun! Fragments are a very cool tool/embellishment you can use on just about anything.

--They're a part of Tim's Idea-ology line by Advantus, and come in three different varieties. The first one that came out is simply called *Fragments* which contains square and rectangular pieces of clear acrylic tiles in different sizes. The largest is a 3.75" x 3.75" inch square, and the smallest is 5/8" x 5/8" inches. There are also various rectangular pieces, and they're all approximately 3mm thick. You get 48 pieces in one package - it's actually a LOT, and goes a long, long way. You can ink them, stamp on them, drill through them, and glue patterned paper to them! All of these supplies are available at Creative Play Stamps.

More recently Tim has released two other varieties: *Charms* and *Ovals & Circles*. The charms are cool because they're shaped like tags and have holes at the top of each charm. They come in many different shapes - square, round, etc...

Here's a photo of the package:


And a description written on the back of the insert:


You can watch the master himself demo-ing the Fragments:
TIM HOLTZ FRAGMENTS *HOW-TO* VIDEO


For my book, I used 2 of the largest square pieces (3.75" x 3.75") and decorated them with Adirondack alcohol inks (Cranberry, Butterscotch, Red Pepper). (See tutorial on the previous posting). Then I measured and drilled 2 holes in the fragments using a drill bit made especially for using on plastics and acrylics. (If you use a regular drill bit it will crack the acrylic and won't drill through correctly.) Then I just fiddled around with my other new goodies: Tim Holtz's *Sprocket Gears*, *Swivel Clasps* and Keyholes, and pushed them around until I liked how it looked. I also rubber stamped 2 more fragment tiles with permanent *Timber Brown Staz-On* ink and shuffled everything around and around until it looked good. The final step was gluing everything down with Ranger's *Glossy Accents* which Tim Holtz recommends for using with Fragments and his metal embellishments.

close up:


I left the bottom right-hand corner empty so I could place a photo or stamped image on the paper behind it and have it showing through. Neat, huh?!?

top view:


The hot orange rings are by *Junkitz* - I bought them about 4 years ago before they went out of business, and the metal button is also an old one by *7 Gypsies*. I custom-made my own half-pearls by soaking them in Adirondack *Espresso* alcohol ink. The pages of the book are thick paper coasters which I cut down to fit the size of the book.

I'm going to post 2 more projects made with FRAGMENTS over the next week. Stay tuned!

~~~ All supplies are available at: Creative Play Stamps ~~~

***I'm currently trying to fix my blog so that people can leave comments - I didn't realize the template I chose doesn't allow for comments!!!

inspiration for today:
*We need the freedom to discover how God wants us to grow, for his design will not look quite the same for everyone.* - John Ortberg

Read more...

Repost: Alcohol Inking Basics on Glossy Paper

Alcohol Inking Basics on Glossy Paper (this is a repost from my other blog)

[I'm reposting this tutorial on alcohol inking basics because I'm going to post some new projects I did with Tim Holtz's Fragments, which involve alcohol inking]

In order to get really good results with the alcohol inks, I recommend you use the tools that Tim Holtz designed to use with them. Pictured here is the Inking Tool and a pack of Applicator Felt pieces (mini pads).


You will also need glossy paper for artists/crafters. Creative Play Stamps carries the paper by Ranger and the tools/inks as well. --You can't use glossy photo paper, btw - it doesn't work. And finally I highly recommend that you also use Blending Solution, although you don't have to. It just helps spread the ink out instead of leaving pure color blobs. It spreads the color out and blends them -- allowing them to meld together in a natural way.

The inking tool has a wood base and medium sized handle -just the right size to fit it your palm. On the bottom of the base is a strip of velcro that's permanently attached, so you can easily put on and/or take off your felt pad.


Simply place the piece of felt onto the the velcro.


It stays put with just the right amount of clinging. It won't fall off while you're using it, but it's easy to take off as well.


Next, choose your color of ink and gently squeeze. It's very easy to control the amount of ink that comes out - the bottle is designed with the artist in mind, and the needle-nose tip makes it even easier to control the flow of ink. I used the color *Meadow* in this example.


Lift up and repeat it again. Place around 4-7 drops on the pad, depending on how large of an area you need to cover.


Now add a few drops of Blending Solution on top of the color drops. (Using the Blending solution is optional, however if you don't use it all you'll get when you apply it to your project is exactly what you see on the felt pad - little drops of color - there will not be any spreading/blending going on.)


You can see how the color drops and Blending Solution have melded together on the pad.


Now pounce it onto the glossy paper.


Keep repeating until you have good coverage.


You can add another color if you want -- simply add a few drop to the felt. You don't need to use a new piece. I used *Ginger* for the 2nd color.

Just pounce away again.

And Voila! Now you have a wonderful new piece of paper! If you want to add another color, just repeat the step above. Add metallic mixatives to spice it up and give it a little tinge of metal!


A SIDE NOTE *** I did the color in 2 steps, however you can do it in one step -- just put different color drops on the felt at the same time (however many you like, really) and then add the Blending solution and pounce away. The result will be similar.

There have been other methods for laying down the color, some people only pounce the blending solution onto the paper after the inks have been applied, and there are still yet other ways to do it.

Remember, the inks can be used on plastic, metal, glass, and other slick surfaces. The inks were not meant to be used on absorbant papers!

ALL MATERIALS ARE AVAILABLE AT CREATIVE PLAY STAMPS

Read more...
May 25, 2009

Turquoise Mocs


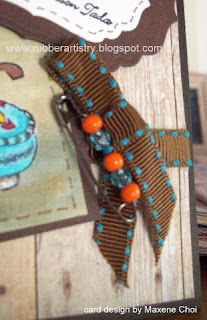
Here is another Moccasins card I made last week.  I had so much fun with this one too!  This time I used LuminArte's Twinkling H20's to paint in the turquoise mocs.  (I used *Mediterranean Blue*) and the rest of the mocs are colored in with Copics and Shimmerz Paints.  I tried really going Southwest with this one and used my *wooden planks* designer paper, indian beads, and matching ribbon!  I hope u like it!


Here's a close up of the shimmery Twinkling H20's and an even better shot at the Shimmerz I painted on top of the dark brown soles and leather laces.  I wanted to brighten them up since the moccasins are shimmery too.  I used *Candle Light* Shimmerz over dark brown Copic markers.


I painted over my foam American Crafts thickers alphabet letters that were lime green - I used a turquoise colored paint and then after they dried I applied some 
Distress Stickles over them.  It's so neat how it looks like chunks of antique broken glass.


Here's a close up of the beads on the safety pin, pinned to the side of the ribbon.  I found the safety pins at a huge new dollar store called *Daiso* which originated in Japan.  You can find everything there - most items are only $1.50!  I found these pins in the sewing section and they say *Black* safety pins but they look more like antiqued pins - I thought they were perfect for using on my vintage-y cards!

Thanks for stopping by!


Supplies:
Stamps:   I Brake For Stamps Large Moccasins, Stampin' Up retired sentiment 
Papers:   White Cascata Cardstock, *Barnwood* dp by Hot off the Press
Inks/Markers:   Copics
Accessories:  Spellbinders Labels Four, ribbon, Prima Forever Flowers Daisy in Copper, Twinkling H20's, Shimmerz (see links above)b

Read more...

May 13, 2009

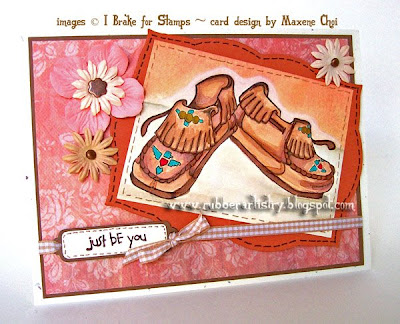
Southwest Moccasins

I fell in love with this stamp when I saw it at *I Brake For Stamps* a couple weeks ago.  Even though I'm not American-Indian there was something about this stamp that made me just have to buy it!  I also usually wait a while to make stuff after I've received an order, but I immediately stamped this out onto cardstock soon after it arrived - I just couldn't wait to get creative with it!  When I was very little I had a pair of moccasins - they didn't quite look like these, but I remember how much I loved them!  Brings back warm memories for me :) !

There is a huge selection of all kinds of images at I Brake For Stamps.  They have lotsa different themes and styles, the selection is endless.  (All the stamps are unmounted).  The owner Della, also has an I Brake For Stamps Yahoo Group where you can get inspiration and all the latest news on her products!

Supplies:
Stamps:   I Brake For Stamps Large Moccasins, The Angel Company *Just Be You* 
Papers:   White Confetti Cardstock, White Cascata Cardstock, various solid-colored cardstock, Fancy Pants *Meadow*
Accessories:  Spellbinders Double Ended Tags, Stampin' Up gingham ribbon, Prima Forever Flowers Daisy in Copper, copper brads, sponges

Read more...

May 6, 2009

The Way, The Truth & The Life


I love this image and bible verse from Heart & Soul Rubber Stamp Co., because it sums up everything about Christ.  He truly is the Way, the Truth and the Life!

Lately I've been listening to Adrian Rogers' podcasts on iTunes, and they just finished running his series on how *Jesus is God's Answer to Man's _ _ _ _ _ *, it's been so awesome.  There are seven sermons in the series:

Jesus is God's Answer to Man's Disappointment
Jesus is God's Answer to Man's Doubt
Jesus is God's Answer to Man's Disability
Jesus is God's Answer to Man's Desire
Jesus is God's Answer to Man's Darkness
Jesus is God's Answer to Man's Despair
Jesus is God's Answer to Man's Death

I originally found his podcasts through his ministry website, Love Worth Finding (www.lwf.org) and now I've downloaded all of them onto my ipod.  I love to listen as I do my chores and garden work!

~SUPPLIES~
Stamps: 1667-Jesus
Papers: K & Co. dp, Stampin' Up cardstock
Inks/Markers:  Tim Holtz distress ink: Antique Linen

Read more...

April 30, 2009

Arches, Rock Formations & Nature ATC Stamps

Hi all, 

here are 2 new cards I made with ATC-sized rubber stamps (2.5" x 3.5")  from Creative Play Stamps' *Arches Collection* and *Nature* category.  They are a selection of photographed scenes of natural rock formations and are perfect for making ATC's, collages, and cards.  (I also have to point out that they're great for making masculine cards).
The stamps in the collection are:  Balanced Rock, Landscape Arch, Rock Formation, Skyline Arch and Three Gossips

For my first card I used *Animas River* from the Nature category.  I had the idea to use both the real and faux stitching from a cowboy card I received from a swap a few years ago.  I also wanted it to look worn and antiqued so I distressed the edges of everything with Tim Holtz's distess ink in *Vintage Photo* using a sponge to apply the ink, and then tore out the image and the corner of the card with my deckle-edged tearing ruler to achieve these torn and tattered looking edges.  I colored in the stamp with my dye ink-based Marvy BrushArt Markers and then huffed on the stamp before I stamped it.  I went over the detail afterwards with darker shades.

I was looking through all my rubber stamp sentiments, greetings & sayings and remembered this stamp from Heart & Soul Rubber Stamp Co., that I recently got and I thought that it went perfectly with my image.   (The birdies are flying away free in the distance!)  I achieved the moon image by punching out a 1 inch round punch scrap piece to make a mask, and then I sponged light blue ink all around it and drew in the birds with a fine black Copic Multi-liner pen.


This next card was also inspired by a swap I got some years back, where they had stamped a single flower then had it peeking out from a frame that had twine tied on all 4 corners.  I thought I would try that on this card and continue the cowboy and distress theme.  This stamp is called *Three Gossips*.  Doesn't it look just like 3 gossiping figures?  They look like they're wearing robes and are leaning in to hear the latest gossip!    I used most of the same techniques on here as I did on the first card.  This sentiment (quote) is also from Heart & Soul Rubber Stamp Co. 


Supplies available at Creative Play Stamps:
FIRST CARD
Stamps: Creative Play Stamps *Animas River*, Heart & Soul Rubber Stamp Co *13117 - Set Free*
misc:  deckle-edged tearing ruler, art sponges, twine, paper piercer

SECOND CARD
Stamps: Creative Play Stamps *Three Gossips*, Heart & Soul Rubber Stamp Co *13106 - Rest*
misc:  art sponges, twine, paper piercer

Read more...

April 26, 2009

April Showers Bring May Flowers Card Contest!

Hello everyone!!!

There's a really fun contest going on over at Creative Play Stamps!!!  It's called *April Showers Bring May Flowers*, and you just need to upload any floral or garden-themed card to the contest forum!  (No purchase necessary).  The stamps do not have to be from Creative Play Stamps.  You can enter as many cards as you like until midnite, May 8.  Then voting begins on the 9th and goes until the 22nd!  The winner will be revealed at the site on May 26th!  Good luck!

There are 1st, 2nd and 3rd place prizes:
1st Prize: **Big Bag of Prima Flowers and a $30 Gift Certificate 
2nd Prize: $15 Gift Certificate 
3rd Prize: $10 Gift Certificate 

**The bag of flowers is about the size of a child's pillow - 13" tall, and 9" wide - and weighs 1/2 a pound! 

Here's a little inspiration to get you going!

DISCO LILIES
Since the 70's and 80's has been back in style for a while,  I thought I'd pay tribute to that era by making an orange and brown 70's style card!  I made the orange and brown madras background using the *Dragged Madras* technique featured at Technique Junkies (aka PatStamps).  It's one of the featured techniques for April/May and can be found here if you're a subscriber.  Since I had been using the Cuttlebug Vintage Corners for another project, I figured I'd just keep using them on these cards.  The Lily rubber stamp is from Creative Play Stamps!


Most Supplies available at Creative Play Stamps:
Stamps: Creative Play Stamps:  *Lilies* and *Alphabet Lowercase*
misc: Cuttlebug Die 2x2 *Vintage*,  Martha Stewart punches: Rose Leaf  & Floral Lace Border, daisy punch, pearl sticker.


THREE TULIPS
This one is a bit more simple.  After the shock of making the retro-70's card I needed to make something a bit more *normal*, lol! I used one of my all-time favorite stamps from Creative Play Stamps, *Three Tulips*.  I just love this stamp and don't ever get tired of using it!


Supplies available at Creative Play Stamps:
Stamps: Creative Play Stamps:  *Three Tulips
Papers:  GCD Studios *Droopy Vines*, Ivory Cascata Cardstock, various solid-colored cardstock.
Inks/Markers:  Marvy Brush Art Markers; Blush Pink, Pink, Dusty Pink, RoseMarie,  Crimson Lake, Jade Green, Taupe
misc: Cuttlebug Die 2x2 *Vintage*,  Martha Stewart Floral Lace Border punch, Martha Stewart wide ribbon *crosshatch hydrangea*, daisy punch, pearl sticker, *Magenta* Stickles, American Crafts Thickers.


Read more...

April 19, 2009

Design Teams!


Hi everyone!!!  I would like to introduce you all to two great rubber stamping companies!  One of them is *Heart and Soul Rubber Stamp Co* and the other one is *Creative Play Stamps* and I just happen to be on their Design Teams!!!  I'm a very lucky lady.  What does it mean to be on a Design Team?  Well, every so often, these companies will send me rubber stamps or other items from their stores so I can get creative and make something artistic with them!  Then I can showcase what I've made here on my blog and elsewhere and let everyone know where to buy the supplies!!!  Fun, huh?

So without further ado, here they are!!!

Heart & Soul Rubber Stamp Company is run and owned by Sue Wiebold.  As her title suggests, Sue's mission is to serve the Lord by serving the public with *unique and creative Christian stamp images*.  The motto of her company is written just below her logo - it's the bible verse from Deuteronomy 6:5 "... love the Lord your God with all your heart and with all your soul...."

From the main website:

Over 900 Unique
Inspirational & Scripture Images
Mounted or Unmounted Available

"Serving Him By Serving You Since 1997"

We are an Angel Company .....

We are joyfully celebrating 12 years in the stamping family! Like many companies, we began with the love of a hobby and a desire to share it with the world!

Our Mission Statement:

To serve Him by serving you with unique and creative Christian stamp images; 
Excellent customer service; an “Angel Policy”; 
The promise that we will never sell or share our mailing list with anyone; 
And a satisfaction guaranteed return policy ☺

At Heart & Soul we truly believe that it’s possible to make a difference in someone’s life by sharing your time and talents with those around you- 
Maybe even an eternal difference by sharing God’s Word with them!

We gladly support K-Love Christian Radio, Shared Hope International and the American Cancer Society as good stewards of the blessings God has graciously allowed us! 
We appreciate your business!

***************************************


*Creative Play Stamps* is run and owned by Art and Laura Hampton.   They have just about any and every paper craft item in the world available for purchase at their online store! Believe me, you'll be AMAZED at their selection, it's simply unrivaled!  You can buy just about anything there that's related to cardmaking and scrapbooking, they have all the hottest toys and new releases, and stuff that's hard to find as well.  (If you're having trouble finding something, look there first!)  They can ship to just about anywhere in the world and ALL USA orders $50 and up receive FREE shipping!  CPS is located in Illinois.

From their site:

My name is Laura, and after enjoying rubber stamping for several years, I decided to try my hand at creating my own images.

With some help from my husband, I started CreativePlayStamps.com.

We are a small company that designs and sells our own line of unmounted rubber art stamps. We are dedicated to helping you discover how economical unmounted stamps are, and to helpingbeginners get started.

Have a question? Please write me at service@creativeplaystamps.com.


**************************************

So, I hope I introduced them well!  You'll be seeing lots of product from them on my blog!  I encourage you to peruse their sites and buy a lot - please tell them Maxene sent you!   xoxoxo

Read more...

Welcome!!! My first official post!

Welcome to my blog!  Although I created it a long time ago, I'm only just now posting on it.  I've decided to put all my rubber stamped creations on here, separate from anything related to the Stampin' Up! company.  The reason for that is because I already have another blog which focuses solely on Stampin' Up! product.  That blog can be found at: www.rubberarts.blogspot.com and if you would like to purchase any Stampin' Up product, you can do so from that blog!  Thanks for visiting!

Read more...
Followers

About This Blog

This blog was created by and is maintained by Maxene Choi.  All Images on my blog are my original handmade creations, unless otherwise noted. Please do not copy or use any of my work without asking permission. These creations are shared for personal or non-commercial use only. Designs may not be copied for the purpose of publication or contest submissions. Please be respectful, thank you!

  © Blogger templates Psi by Ourblogtemplates.com 2008

Back to TOP